
 I recently posted about the process I took to get data from an old FreeNAS to a new one. Truth be told, that process did work (and reasonably well), but I ended up tweaking things a bit more … actually a lot more. I won’t go into details about it, as it isn’t really relevant, but as I was mucking about, I found myself running a handful of commands over and over.
In a similar fashion to this VMware & Cisco cheat sheet that I wrote up not too long ago, I figure I would do a similar one for ZFS. Note that this isn’t supposed to be an all encompassing guide, but rather more of a taste of what can be done without going down the rabbit hole.
Terms
First off, let’s get some basic terminology out of the way.
zpool- In the simplest form, the zpool is a group of vdevs (virtual devices) which are typically made up of disks. I’m not going to go into the different combinations with regards to performance vs. capacity vs. reliability. But for the examples in this posts, I’ll have four disks in one zpool.
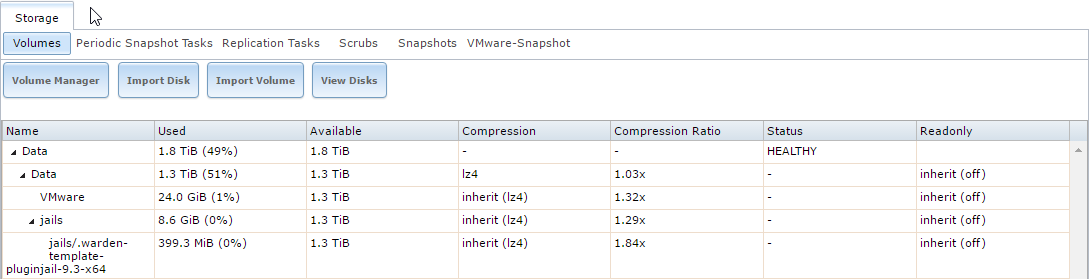
Dataset- This is the file system portion of ZFS, which sits on top of the zpool. In Windows terms, the zpool would be the disk(s) that makes up the drive, and once it’s formatted (e.g. the c:\) then that is the dataset. Things like compression and dedupe can be defined on the dataset. Datasets can also have ‘child’ datasets under them - these can inherit their compression and dedupe settings from their parent datasets.
zvol- These are a bit different that a dataset. If you were to think of a dataset as a NAS-type device (i.e. file-based), then the zvol is more of a SAN-type device (block base). If you want to carve out a chunk of storage and present it over iSCSI, you would use a zvol. zvols can use compression, which can be inherited from its parent as well.
For the purpose of this post, I am going to be focusing on creating a zpool, creating a dataset, snapshots, and replication. ZFS is a huge topic, one which I am be no means an expert at. So, I won’t be touching on caching drives, performance best practices, etc.. It is also worth noting that all of this was done on a FreeNAS 9.10 box, so results may vary.
ZPOOLS
First up, lets create a new zpool. In the example below, I am creating a new pool (named poolName - replace with what you would like), using two disks. These disks are located under /dev/gptid.
zpool create poolName gptid/ee1716a2-af82-11e6-9293-a4badb44e695 gptid/eee80c33-af82-11e6-9293-a4badb44e695
If I had a total of four disks available, I could create a mirrored pool (2+2) using the following command. Note the mirror before each pair of disks - this is how the groups are defined for the mirrors.
zpool create poolName mirror gptid/ee1716a2-af82-11e6-9293-a4badb44e695 gptid/eee80c33-af82-11e6-9293-a4badb44e695 mirror gptid/efc12bf0-af82-11e6-9293-a4badb44e695 gptid/f09215d6-af82-11e6-9293-a4badb44e695
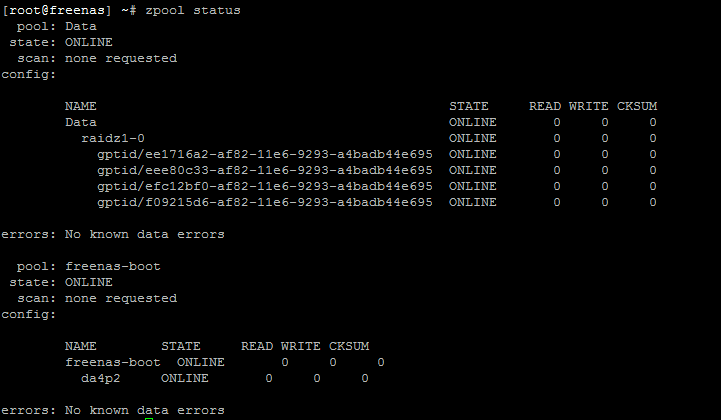
In my case, I ended up going with a RAIDZ configuration, which allows for one failed disk. So my command looked like:
zpool create poolName raidz gptid/ee1716a2-af82-11e6-9293-a4badb44e695 gptid/eee80c33-af82-11e6-9293-a4badb44e695 gptid/efc12bf0-af82-11e6-9293-a4badb44e695 gptid/f09215d6-af82-11e6-9293-a4badb44e695
Now that we have the pool created, we can check the status with ’ zpool status -v’. You should hopefully see something like the below.
CREATING ZFS DATASETS
Now that we have a zpool setup, let’s create a new dataset:
zfs create poolName/mountPoint
That’s it! That will create a new dataset called mountPoint which can be found under /mnt/poolName/mountPoint.
If I wanted to create multiple child datasets, I could do so by just pointing to a submount point:
zfs create poolName/mountPoint/subMount
Now if you look in /mnt/poolName/mountPoint you will see the new subMount directory.
You can quickly find a list of all ZFS datasets by running
zfs list
DELETING ZFS DATASETS
Let’s say you want to delete the subMount dataset; that can be done with:
zfs destroy poolName/mountPoint/subMount.
What if you wanted to delete the entire thing, but you have a slew of child datasets. Well, you could delete them all one by one, or you could recursively delete them. Note that the -F is not mandatory, but it indicates that it should be ‘Forced’.
zfs destroy -R -F poolName/mountPoint
CREATING ZFS SNAPSHOTS
One of the beauties of ZFS is its built in snapshots. This is handy for so many reasons: replication, frequent restore points , or for testing out changes. Creating a snapshot of a dataset is fairly straightforward - just indicate the dataset path followed by an @ and a snapshot name.
zfs snapshot poolName/mountPoint@s1
To list all snapshots:
zfs list -t snapshot
To delete a snapshot:
zfs destroy poolName/mountPoint@s1
SNAPSHOT REPLICATION
In order to replicate between two ZFS file systems, you’ll need some sort of connectivity. In this case, I’ll use ZFS send to indicate what dataset will be sent, pipe it through a SSH connection, and then indicate where to receive the data on the remote end.
zfs send poolName/mountPoint@s1 | ssh 192.168.1.2 zfs receive Tank/mountPoint
In the example above, we are assuming that snapshot named s1 exists for poolName/mountPoint. From there, we are connecting to the remote system (192.168.1.2) and writing the snapshot to Tank/mountPoint (where Tank is the name of the zpool on the remote end).
Hopefully the above is useful to get things going. ZFS has what seems to be a billion features in it, and this post doesn’t even begin to scratch the surface. There is a lot that can be done, and as with any good tool, flexibility is a characteristic that is only of value if you know how to use it.