Configuring & Testing the vSphere ESXi Dump Collector
Just a quick post today about a feature / configuration within vSphere that some folks may not be aware of.
When troubleshooting issues, especially with ESXi hosts, we quite often need to collect log files to pass onto VMware support. Depending on what the issue is, if the affected host(s) crash, then there should also be a coredump. The coredump contains kernel-level details which can significantly help troubleshoot issues.
The problem that I have seen some folks run into is with regards to the coredump location. In some cases such as PXE booting, persistent storage may not be available. This means that every time a host is rebooted, the contents of the storage is wiped. If you are writing coredumps to that location, then you’ll lose that valuable data.
This is where the Dump Collector comes in. Its purpose is to provide network location to write those coredumps to. The idea being that if you can’t collect it locally, at least you’ll hopefully still be able to collect some data. I say “hopefully” because if you have underlying network issues, whether with the physical network or with the networking hardware inside your ESXi host, then you may lose communications before the coredump can be written.
STEP 0 – CHECK YOUR CURRENT CONFIGURATION
The first thing you’ll want to do is check if you have a current coredump location set. You can do this by running the following command on your ESXi host:
esxcli system coredump partition get
In my case, my results look like:
Active: t10.SanDisk00Ultra_Fit000000000000004C530001180606100525:9
Configured: t10.SanDisk00Ultra_Fit000000000000004C530001180606100525:9
You’ll see that both my Active and Configured are pointing to my SD storage that I use in the home lab. It is worth it to note the difference between Active and Configured. The Configured option is what ESXi is set to use upon boot, for example. The Active one is what is currently set. These can be different.
STEP 1 – ENABLE THE ESXI DUMP COLLECTOR SERVICE
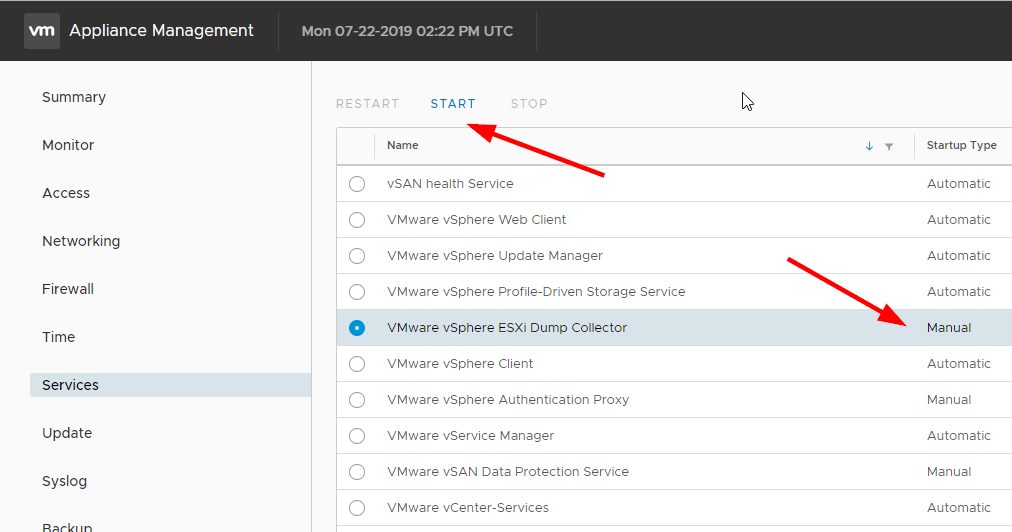
The vSphere ESXi Dump Collector service runs on the vCenter appliance, and is set to a Manual start by default. To enable it, you’ll need to log into your vCenter VAMI (https://vCenterIP:5480), go to Services –> find and “check off” VMware vSphere ESXi Dump Collector –> hit START.

STEP 2 – CONFIGURE & TEST THE ESXI HOST
Now that vCenter is configured, we need to setup the individual hosts. The setup is fairly straightforward and can be achieved, and confirmed with the following commands (note that each command starts with esxcli – line wrapping may obfuscate this):
esxcli system coredump network set --interface-name vmk0 --server-ipv4 vCenterIPAddress --server-port 6500
esxcli system coredump network set --enable true
esxcli system coredump network get
Lastly, we’ll want to test to ensure communication. This can be achieved with running the following command on your ESXi host:
esxcli system coredump network check
If you do run into trouble, some common things to check are:
- Do you have the proper IP for your vCenter?
- Is the service running on your vCenter?
- Are there any firewalls in the way?
FURTHER READING
The above is a quick run-through to get things up and running. If you want to read further about this feature and its setup, I recommend checking out the following VMware KBs.


Pingback: Configuring & Testing the vSphere ESXi Dump Collector – Veeam Vanguards Central