Hands On With Veeam v11 CDP
Anyone who is a Veeam user is likely well aware of Veeam’s “upcoming” CDP (Continuous Data Protection); it has been somewhat notorious as it was announced way back at VeeamON 2017 in New Orleans. Over the course of time, the release date has slipped a few times, but largely for good reason (e.g. stability or performance issues were deemed unsatisfactory by Veeam’s internal QA process). I most recently wrote about it again last year, when we got another preview of the tech at the Veeam Vanguard Summit.
Alas, with 2020 unfolding how it has, some welcome news is here: CDP will be a part of Veeam v11! Since I’ve been literally talking about this feature for years, I’m pretty excited to share what I’ve seen with it.
CONFIGURING YOUR ENVIRONMENT
Please note that the experience below as well as the screenshots are based off of the version 11 beta 2 code. This will be visible in some spots as terms such as [TBD] may be visible. Additionally, there is the chance that some functionality may still change before GA.
I’ve previously covered the tech behind CDP, which leverages VMware’s VAIO (vSphere APIs for I/O Filtering), so I won’t get into that portion. What is worth noting though is that vSphere 7.x supports VAIO (this is not to say that Veeam v11 is vSphere 7 certified).
I n order to leverage these filters, the ESXi hosts in your datacenter need to be prepped. You can accomplish this by going to Inventory –> Virtual Infrastructure –> vCenter Servers –> vCenter (in my case, vcenter.42u.local), and clicking on “Manage I/O Filter”. This will launch an install wizard which allows you to select which cluster(s) you want to install the filter onto. From there Veeam will push out the filters to the hosts.
However, there is a caveat that your hosts need to be set to have a VIB acceptance level of Community (the default is “partner”). If you don’t change this setting, you’ll receive an error message: “Illegal acceptance level ‘partner’, required: ‘community'”. It is crucial to understand what this setting is, as well as what the impact (from a support standpoint) is if you make the change. I highly encourage you to check out the VMware Manage the Acceptance Levels of Hosts and VIBs documentation.
If you are comfortable and understand the implications, you can go ahead and run the following command on each host in the clusters that you plan on installing the I/O filter onto:
esxcli software acceptance set --level CommunitySupported
NOTE: I’ve been told that the expectation is that the final GA release will signed as “Partner”; thus the above step may not be necessary.
If you need to enable additional clusters at a future date, you can do so by going to Inventory –> Expand the vSphere infrastructure until you drill down to the appropriate cluster, right-click –> Install I/O Filter.
CDP PROXIES & CREATING A CDP JOB
Now that the hosts are ready to go, you’ll see a new option on your menu: CDP Policy

In order to use the CDP, you’ll need to setup CDP proxies. Clicking this will bring up the New CDP Proxy wizards, which will walk you through the steps to get it up and running. Much like VBR’s other proxies, the VBR server itself can be a CDP proxy. Among the settings that you can configure are items such as cache size, as well as defining network traffic rules. Once you get that all configured, you’ll be able to setup a CDP job. If you need to add additional CDP proxies in the future, you can do so via the Backup Infrastructure –> Add Proxy menu.
Immediately after the CDP Wizard completes, the CDP Policy Wizard will launch. You’ll have a set of options here including:
- Replica Seeding
- Network remapping
- Replica re-IP
What’s nice about the above is that it is not a single choice, but rather these are checkboxes. That is to say if you have a need for any combination of the three, then you are good to go. In my case, I’m replicating between two clusters in my home lab on the same VLAN / subnet, so I did not choose any of the options.
Selecting the VMs you would like to use CDP is very similar to what you see when creating a backup job. What I am very happy to see is that vSphere Tags are an option – this really lends flexibility when defining policies for VMs. As part of the build process, build teams can easily assign a tag and ensure that the new builds are in compliance.
DEFINING SCHEDULE OPTIONS
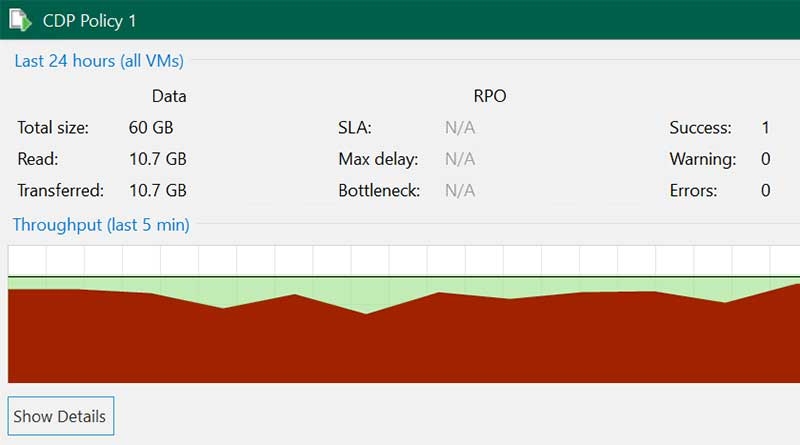
 The Schedule options are really where the meat of this feature comes in. This is where you get to define some key targets, with the most notable being the Recovery Point Objective. This value will indicate what your target interval is for replication. Or said in another way: how often do you want to replicate the data. The setting can go as low as 2 seconds, but that obviously has some significant challenges. When replicating data, there are many components involved: ESXi hypervisor, CPU utilization, memory utilization, network, storage, and Veeam, just to name a few. Keep in mind that all of those components need to work in harmony in order to meet those RPOs. As nice as it would be to set a low value, bear in mind that many infrastructures can’t handle that out of the box.
Additionally, the Reporting button will give you some nice options to let you know when you are not meeting your SLA. There is some nice flexibility with optional alerts for warnings and errors. The rest of the options on the scheduling page allow you to customize your short-term and long-term retention criteria.
With that done, you can go through the rest of the Wizard and start the job. The job will start with a sync and then progress to attempting to adhere to the CDP Policy.
INITIAL IMPRESSIONS
This feature has been a long time coming – approximately 3.5 years. Even so, it will definitely bring Veeam to an even higher-level within the world of enterprise backup. CDP is a feature that is out of reach for most smaller organizations as it has been cost prohibitive. In larger organizations with bigger budgets, the costs associated with replication can still mean only selective VMs have that privilege.
That’s not to say that you should immediately start replicating all of your VMs. Rather, you’ll want to ensure that you have capacity in all the areas that matter. Further to that, you’ll need to take into account things like:
- geography (e.g. will destination targets need to adhere to GDPR?)
- costs associated with additional hosts / storage / bandwidth
- and frankly, does the data need to be that highly available.
All in all, it’s great that one of the most anticipated features ever from Veeam finally making its public debut.


Pingback: Veeam Backup & Replication V11: маленькие штучки - KorP`s blog